Quickstart
Note
Add the sitecats application to INSTALLED_APPS in your settings file (usually ‘settings.py’).
Let’s allow categorization for Article model.
First, inherit that model from sitecats.models.ModelWithCategory.
Then we need to add at least one root category, to show up in our categories editor.
Let’s create two root categories with language and os aliases. This could be done either programmatically (instantiate Category model) or with Django Admin Contrib (install django-admirarchy to simplify navigation).
Now to our views:
# Somewhere in views.py
from django.shortcuts import render, get_object_or_404

# `Article` model has sitecats.models.ModelWithCategory class mixed in.
from .models import Article


def article_details(self, request, article_id):
    """Nothing special in this view, yet it'll render a page with categories for our articles."""

    article = get_object_or_404(Article, pk=article_id)

    # Let's configure our category lists a little bit:
    # * show titles of parent categories,
    # * apply Twitter Bootstrap 3 css classes to categories.
    article.set_category_lists_init_kwargs({
        'show_title': True,
        'cat_html_class': 'label label-default'
    })

    return self.render(request, 'article.html', {'article': article})

def article_edit(self, request, article_id):
    """This time we allow the view to render and handle categories editor."""
    article = get_object_or_404(Article, pk=article_id)

    # Now we enable category editor for an article, and allow users
    # to add subcategories of `language`, and `os` categories and link articles to them.
    article.enable_category_lists_editor(
        request,
        editor_init_kwargs={'allow_new': True},
        lists_init_kwargs={
            'show_title': True,
            'cat_html_class': 'label label-default'
        },
        additional_parents_aliases=['language', 'os']
    )

    form = ... # Your usual Article edit handling code will be here.

    return render(request, 'article.html', {'article': article, 'form': form})
- Template coding basically boils down to
sitecats_categoriestemplate tags usage:
<!-- article.html
     The same html is just fine for demonstration purposes for both our views.
     Do not forget to load `sitecats` template tags library. -->
{% extends "base.html" %}
{% load sitecats %}

{% block contents %}
    <!-- Some additional functionality (e.g. categories cloud rendering,
         editor enhancements) will require JS. -->
    <script src="{{ STATIC_URL }}js/sitecats/sitecats.min.js"></script>

    <h1>{{ article.title }}</h1>
    <div id="article_categories">
        {% sitecats_categories from article %} <!-- And that's it. -->
    </div>
    <!-- Form code goes somewhere here. -->
{% endblock %}
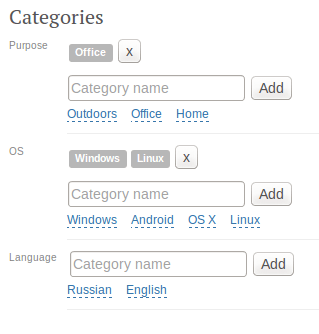
Add some categories.
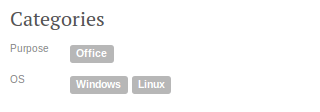
That’s roughly what we could have on details page:
And on edit page: